Brick Veneer on Steel Stud Framing
This versatile wall system features a long-lasting, low-maintenance brick façade with a steel structure.

Back
Recommended Building Types
- Office and industrial buildings, hotels, shopping centers and restaurants
- Use where budgets are more important than longevity
- Choosing the Right Masonry System for your Budget
Benefits
- Looks like a solid masonry building but a steel stud backup system usually costs less
- Lighter weight than brick on CMU cavity wall
- Many of the benefits of a masonry façade: durability, low maintenance, high fire rating, and numerous design choices
- drainage cavity keeps building interiors dry
Special Considerations
- Steel studs flex more than masonry veneer – this can lead to cracks developing in the masonry unless the studs are designed to strict deflection tolerances
- Volatility of steel prices makes it difficult to predict final project costs
- Multiple trades involved, which makes jobsite coordination more difficult
- Tolerances for steel erection are looser than those for masonry – which can lead to conflicts during veneer construction
- Steel studs can corrode if water penetrates past the drainage cavity or due to condensation
- Interior surfaces (drywall) prone to vandalism and damage in heavy traffic areas
- There is a potential for mold growth on sheathing unless mold-resistant sheathing is used
Definition and Assumptions
Backup: 16 gauge x 6″ deep Steel studs @ 16″ on center
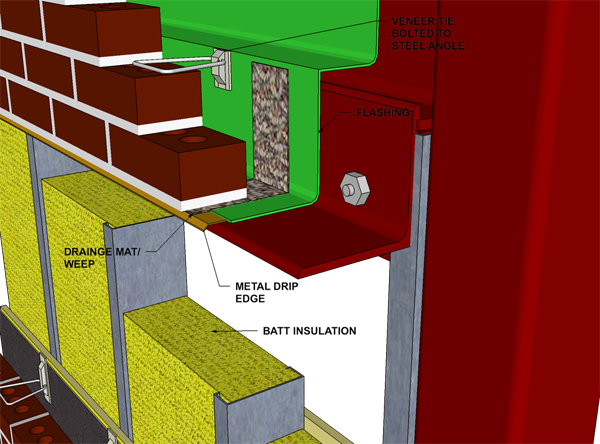
Insulation: Fiber batt between studs
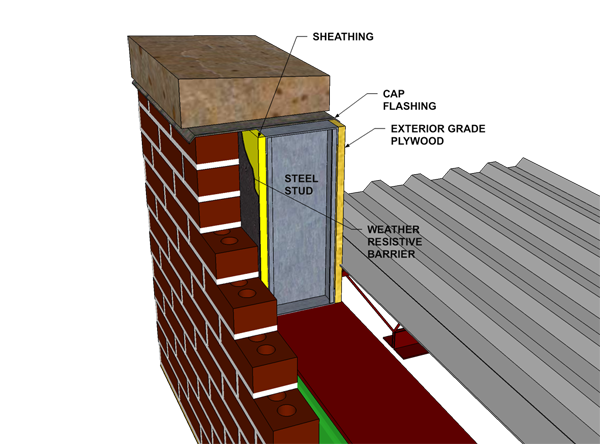
Sheathing: 5/8″ exterior grade gypsum board, screwed into studs
Weather resistive barrier: 15 lb. building paper
Veneer: Cored modular clay brick 2-1/3″ x 4″ x 8″ (nom.)
Cavity: 2 inch air space
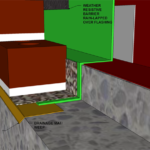
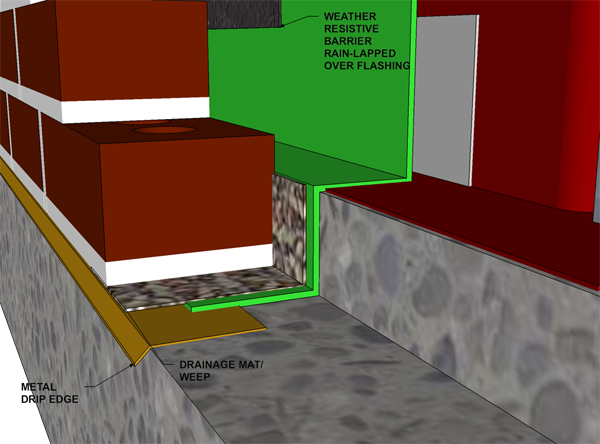
Flashing: Base Flashing and weeps
Veneer ties: Adjustable 2-piece ties screwed into studs. Spacing: 16″ vertical x 16″ horizontal
Shelf angle: To support brick at the floor line if building is taller than 30 feet
Mortar: Type N, Portland cement/lime, plain gray
Joints: concave tooled
Regional Variations
- When masonry veneer is used in areas of high seismic risk, Veneer ties are required to attach to wire reinforcement embedded in Mortar bed joints in the veneer. Check your local requirements – and save money by using normal Veneer ties in areas of low seismic risk.
Fire Rating (hours)
2 hours: (includes 3 layers of gypsum board as part of wall system)
Sound Transmission Class (dB)
Wall Weight (lb/sq. ft.)
47 lb/sq. ft.
Energy Rating
R-value: 22.2
Calculation:
| Outside Air | =0.17 |
| Brick | =0.44 |
| Air Gap | =0.97 |
| Gyp board | =0.45 |
| 6 inch batt insulation | =19.00 |
| Interior Air | =0.68 |
| Total | =22.16 |
Sustainability & LEED
- Energy efficiency, thermal comfort and energy analysis – up to 10 pts
- Innovation and design – 1 pt
- Recycled content – 2 pts
- Regional material (where applicable) 2 pts
- Renewable energy and thermal mass – up to 10 pts
- Sustainablility and Brick
Design Tips
- Use insulation that is installed in the cavity whenever possible: it is nearly continuous and is much more effective than insulation installed between the studs. Studs provide a direct thermal path through the wall and reduce insulating efficiency. Studs are denser than the insulation and the cold travels through the studs and ignores the insulation. This phenomenon can reduce the insulating capacity of a wood stud wall by 40% and by 60% when Steel studs are used.
- New requirements in energy codes may require that you use rigid insulation in the veneer drainage cavity when the structural backup is built of wood stud or steel stud. If your construction project is subject to the International Energy Conservation Code (IECC) or the requirements of ASHRAE-2004 or ASHRAE-2007, you might be required to also install a continuous layer of insulation to this wall. IECC requirements vary by climate, so make sure you understand local conditions and what energy code is relevant in your area.
- Use galvanized hardware (including screws) for masonry Veneer ties to minimize corrosion potential.
- Design the steel stud backup to a deflection limit of L/720 to minimize veneer cracking.
- Tighten up the tolerances for steel construction to match those for the masonry veneer. Some of the difference can be taken up in the drainage cavity but there can also be significant conflicts between the steel erection and masonry trades.
- shelf angles may not be required for veneer support at every floor line. Cut down on the number of shelf angles to save money and simplify your construction. If your veneer is shorter than 30 feet above the top of the foundation wall, you may not need relieving angles at all.
- Attach windows and doors to the structural Steel studs, not the masonry veneer.
- Make sure you have at least ¾” overlap of the door and window jambs onto the brick veneer. Install backer rod and sealant around all openings and where different materials meet.
- You must use sheathing to face the steel stud wall at the drainage cavity.
- Use building paper to cover the sheathing, or use a water resistant sheathing with taped joints.
- Design Guide for Anchored Brick Veneer Over Steel Studs
Construction Tips
- Meet with the general contractor early in the project to make sure the steel erector understands masonry construction tolerances.
- Anchor Veneer ties into the steel stud using galvanized screws. Anchorage into sheathing alone is not permitted.
- Use two-piece adjustable ties that can slip vertically but are rigid horizontally.